Knowledge Base Output
The Knowledge Base Output replaces the Content Only output for generating Atlassian Confluence, Salesforce, Servicenow, Zendesk, Zoho and Adobe Experience Manager (AEM) outputs. Content Only remains for XHTML outputs.
Before creating any of the Knowledge Base output types, you must have an account set up with whichever service you use. Setting up those accounts is outside the scope of this topic.
Creating a Knowledge Base Preset
Click the + icon in the Output Presets panel to create a new output and configure it as below.
After the preset is configured, use the icons above the list of presets or hover the mouse over a preset in the list to generate the output, publish it, make further edits or duplicate the preset.
The configuration options are described in detail in the online help. Variables can be included in the Title. Place the cursor where you want the variable and press CTRL + 1.
When you create the preset, you will need to select the target type, Salesforce, Servicenow, Zendesk or Zoho. You will then see that target in the options on the left and in the Target dropdown. If you will be generating to more than one knowledge base service, create a separate Knowledge Base preset for each type.
Before Configuring the Preset
You will need to have a Publish Profile set up for whichever service(s) you use. Publish Profiles are set up from the Edit menu.
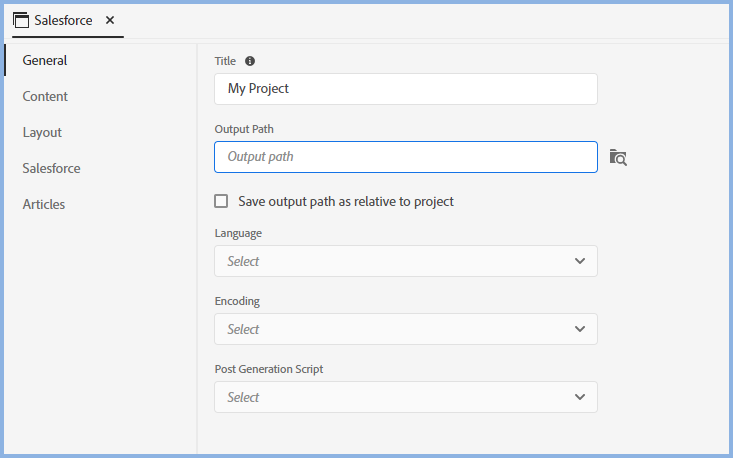
General Settings
According to which Knowledge Base type you selected when creating the preset, you will see that type where Salesforce is shown above. The different types are described below.
Output Path
By default the Output path will be created as an absolute path but you can choose to create a relative path.
Select or deselect the Save Output Path As Relative To Project to change the setting. Adobe RoboHelp will open Explorer to the current folder where you can either click Save Folder to retain the same path or browse to somewhere else.
- If you are a lone author always working on the same machine, you can choose either but the absolute option is recommended so that you can see exactly where the output will be saved.
- If there are multiple authors and/or you work on more than one machine in a non source controlled environment, then the relative path option may suit you better.
This will enable each author to generate to different folders as long as the same relative relationship is maintained. - The relative path option will work better if a project will be worked on using both Windows and Mac machines.
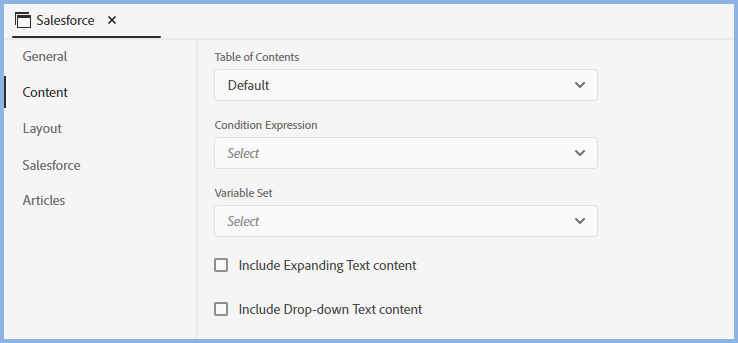
Content
AEM
AEM will show the TOC as designed in Adobe RoboHelp.
Atlassian Confluence
Confluence has the concept of Spaces which can be thought of meaningful categories/folders/containers to organize your content.
Content can be published in these spaces in different Pages that can be nested under other pages to create a hierarchy of content in the form of a page tree.
The topics in the TOC will be published in the same structure as a page tree under the specified Page.
If no page is specified, then content is published in the root of the selected space.
Salesforce and Servicenow
- Do not have a concept of levels so any structure in the TOC will be ignored and the topics will be presented as a straight list.
- Do not permit the use of javascript within articles so your content must not use dropdown text, expanding text or thumbnail images. Dropdown and Expanding Text content will be preserved but not in that format.
Zoho
Zoho allows 5 levels of nesting in the TOC.
On the Zoho site, a section (book) in the TOC can contain either articles or other sections but not both.
Allowed
Section(Book)1
Section(Book)2
Topic 1
Book3
Topic 2
Not Allowed
Section(Book)1
Topic 1
Section(Book)3
Topic 2
Zendesk
Topics must be at Level 2 in the TOC. You cannot include topics under top level books.
Section(Book)1
Section(Book)2
Topic 1
Section(Book)3
Section(Book)4
Topic 2
Layout

Select the required Page Layout.
Adobe Experience Manager (AEM)
AEM is an Enterprise level solution that you can learn about here. There is also a recording of a webinar showing how AEM works with Adobe RoboHelp.
If your organisation is already using AEM then you might want to discuss outputting your project to this knowledge base. It provides analytics and real time dynamic content widgets.

Publish Profile - Select the required profile.
Site - Select the AEM Site to which the articles are to published.
Category - Select the Category in the AEM Site in which the articles are to published. A single AEM site can have multiple categories.
Section Template - Select the AEM template to be applied for the published books (sections) in TOC.
Article Template - Select the AEM template to be applied to the articles that are about to be published.
Asset Upload Path - Select the path, where all the assets of the articles such as images and pdfs are to be uploaded.
Post Publishing Workflow - For AEM users, the dropdown list will be populated with their workflows.
Remove Topic Heading from the Article Body - Removes the topic title if styled as H1 in the topic body. The title of the topic is available as part of template so if this option is not selected, two titles will appear in the published article
Upload Images - Select this checkbox to include images in the upload.
Upload Linked Documents - Select this checkbox to include documents in the upload.
Republish All Assets - Select this checkbox to update all assets, not just those that have changed
Atlassian Confluence

Publish Profile - Select the required profile.
Space - Content is organized in Confluence in different spaces (can be thought of as folders). The topics configured for this preset will be published to this Space.
Page - The parent page where the content is to be published. The topics in the TOC will be published in the same structure under this page.
If no page is specified, then content is published in the root of the selected space.
Convert All Styles to Inline Styles - All required styling needs to be inline as Atlassian Confluence will not apply any CSS styling.
Remove Topic Heading From the Article Body - Atlassian Confluence shows the Topic Title at the top as a heading. The topic will include your Topic Heading.Select this checkbox to avoid duplication.
Upload As Draft - Select this so that the upload can be checked before making it available to end users.
Upload Images - Select this checkbox to include images in the upload.
Upload Linked Documents - Select this checkbox to include documents in the upload.
Salesforce Knowledge Base
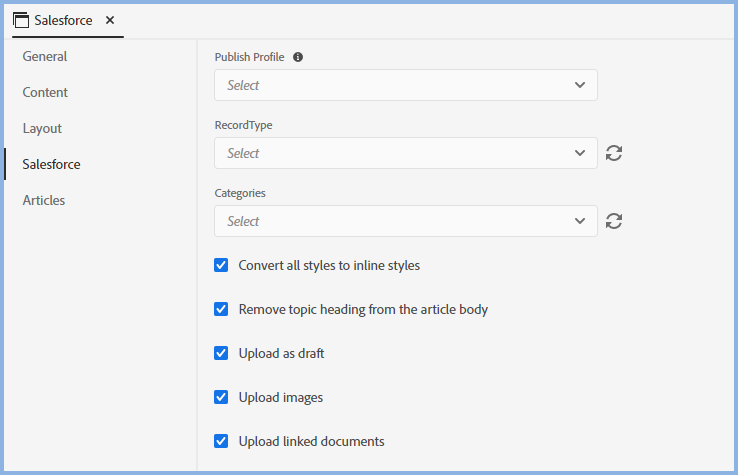
Publish Profile - Select the required profile.
Record Type - Record Types are configured in Salesforce and define how and which records should be displayed. The topics configured for this preset will be published to the selected Record Type.
Categories - Categories are a way to group topics and set who can use them. The dropdown will display what has been set up in Salesforce.
Convert All Styles to Inline Styles - All required styling needs to be inline as Salesforce will not apply any CSS styling.
Remove Topic Heading From the Article Body - Salesforce shows the Topic Title at the top as a heading. The topic will include your Topic Heading. Select this checkbox to avoid duplication.
Upload As Draft - Select this so that the upload can be checked before making it available to end users.
Upload Images - Select this checkbox to include images in the upload.
Upload Linked Documents - Select this checkbox to include documents in the upload.
ServiceNow Knowledge Base

Publish Profile - Select the required profile.
Knowledge Base - Select the required ServiceNow Knowledge Base
Publish All Articles In The Same Category - By default, the selected articles are published to the site and the Adobe RoboHelp TOC is maintained.
The sample Adobe RoboHelp TOC below will be the same on Zoho if this check box is not selected.
CatA
SecA
Article1
CatB
SecB
Article2
If this check box is selected, two further fields will be displayed. If say the default category, default section are entered as DefaultCat and DefaultSec respectively the TOC on the site display as
DefaultCat
DefaultSec
Article1
Article2
Convert All Styles to Inline Styles - All required styling needs to be inline as Servicenow will ignore any CSS styling
Use Search Keywords From Topic As Article Tags - ServiceNow uses Article Tags, Your search keywords can be used for tagging.
Upload As Draft - Select this so that the upload can be checked before making it available to end users.
Upload Images - Select this checkbox to include images in the upload.
Upload Linked Documents - Select this checkbox to include documents in the upload.
Zendesk Help Centre
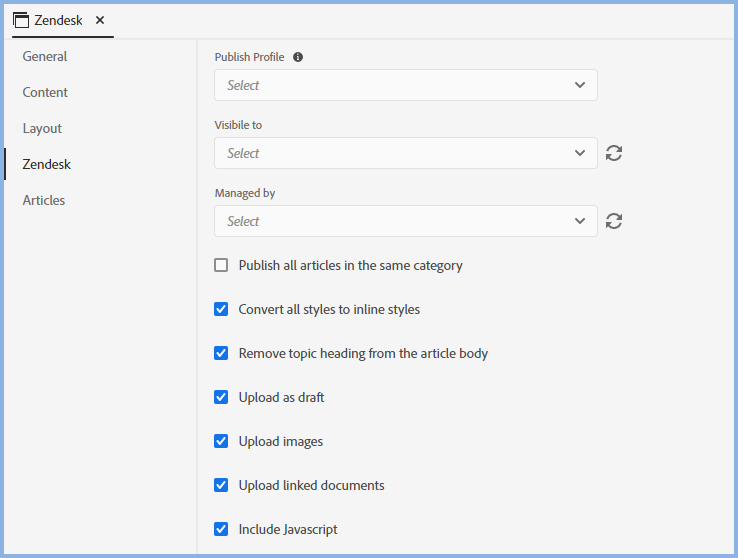
Publish Profile - Select the required profile.
Visible To - The options shown here are configured in Zendesk and define who can view the topics.
Managed By - The options shown here are configured in Zendesk and define who can update or delete the topics.
Publish All Articles In The Same Category - Select this option to display two dropdown lists. Select the required Category and Section.
Convert All Styles to Inline Styles - All required styling needs to be inline as Zendesk will ignore any CSS styling.
Upload Images - Select this checkbox to include images in the upload.
Upload As Draft - Select this so that the upload can be checked before making it available to end users.
Upload Linked Documents - Select this checkbox to include documents in the upload.
Include Javascript - Unlike Salesforce and Servicenow, Zendesk does permit the use of javascript in topics You must select it here and also enable it in your Zendesk configuration. If not enable there, the javascript will be shown as text.
Zoho
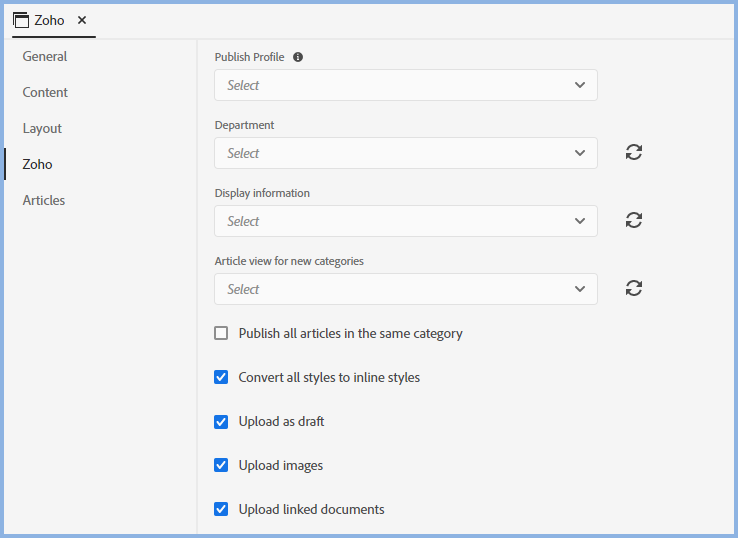
Publish Profile - Select the required profile.
Department - Select one of your pre-existing departments. Click the refresh icon to update the list.
Display Information - Any groups that you have set up in Zoho will be displayed here. Select as required. Click the refresh icon to update the list.
Article View for New Categories - Select List View or Quick Navigation. Click the refresh icon to update the list.
Publish All Articles In The Same Category - Select this option to display two dropdown lists. Select the required Category and Section.
Convert All Styles to Inline Styles - All required styling needs to be inline as Zoho will ignore any CSS styling.
Upload As Draft - Select this so that the upload can be checked before making it available to end users.
Upload Images - Select this checkbox to include images in the upload.
Upload Linked Documents - Select this checkbox to include documents in the upload.
Articles

This screen displays all the topics in the TOC selected in the Content screen. Here you select the Articles check box to select all or you can select specific topics. Topics selected will show a menu icon when scrolled over and you can select the Preview option to see how the topic will appear in the knowledge base.
Publish
See the Publishing topic.
Donations
If you find the information and tutorials on my site save you time figuring it out for yourself and help improve what you produce, please consider making a small donation.