Importing/Linking Word and FrameMaker Docs
 Both Importing and Linking have been greatly simplified.
Importing Word Documents
Click File > Import or right click in the Contents Panel and select Import > Word Document, then browse to the document you want to import to start the process.
You don't have to have any version of Word installed on your computer. You can import any Word document created in Word 2013 or higher and saved in DOCX format.
Configure the settings as below.
General Settings
|
|
Word Document As soon as you have selected the document, in the bottom right corner of the window you will see Adobe RoboHelp reads the document after which you can proceed with the other settings. You can only import documents in DOCX format. If they are in DOC format, you need to upgrade them first. Load Settings The default WSF (Word Settings File) set in Project Settings will be displayed. Use the search icon to change to another WSF file if required. CSS File For Style Mapping Select the CSS file to be used for mapping.
Start New Topic From Style If you want to break your document into a number of topics, set the style(s) to be used here. Click the dropdown and select the styles required. Click to the right of the dropdown to close it. If you want to use the TOC hierarchy in Advanced settings (Add Generated Topics to Table of Contents, you need to split the document using the same styles. Topic Name Pattern Set the Topic Name Pattern if you want something other than the default. Use Only ASCII characters Tick this option if your file names or the styles to be used for setting the Topic Name Pattern have any characters that might cause problems after import. Generally it can be left blank. |

Advanced Settings
|
|
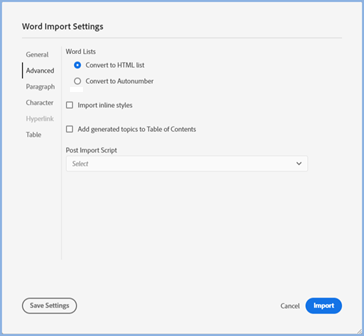
LIsts can be a problem with any Word documents imported into any HTML editor. The underlying reason is that in Word the list styles are not truly lists in the HTML sense, they are in fact paragraph styles with autonumbering applied. That means the conversion is trying to map two incompatible styles. Now two options are provided to give a better import. Convert Word Lists to HTML Lists This is the default as in most cases it is best to select the Convert to HTML List check box. Your lists may not be exactly as you want them until you have made the changes described in Post Import. If they are still not right then you could try the next option. Convert to Autonumber This option will convert the list to an Adobe RoboHelp generated autonumber style. In topics with two or more lists the number will be continuous on import but you can restart each list as required.
Import Inline Styles If the document has content where text has been selected and then some formatting such as a colour or bold has been applied from the Word toolbar rather than by applying a character style, select this check box if you want that styling to appear in your topics.
Add Topics to Table of Contents If you select Add Topics to Table of Contents, you will be able to create a new TOC or add to an existing TOC. A page will be created in the TOC for each topic created on import. By default all the topics will be at the same level. However, there is a check box you can select so that the TOC follows the hierarchy of the styles and you can set which styles are to be used for the TOC hierarchy. The Word Style(s) shown on the left will be whatever you have defined in General Settings to split the document. On the right you select the TOC heading level for that Word style. Post Import Script Supplied scripts or your own scripts can be set to run automatically after import. |
 A list in Word is not a true list in the HTML sense, it is an autonumbered paragraph. This can cause issues when importing and Convert to Autonumber may help. Note however that autonumbered styles may not meet accessibility requirements. See the
Automapping
Before looking at the remaining settings, you need to understand how automapping works as this applies to the Paragraph, Character, Hyperlink and Table Settings.
Adobe RoboHelp attempts to automap styles where it can match the name in the Word document with a style in the CSS defined for style mapping. Against each style in Character, Paragraph and Table settings you will see how the styles have been mapped.
You then have the option to change any of the mappings by clicking the dropdowns.
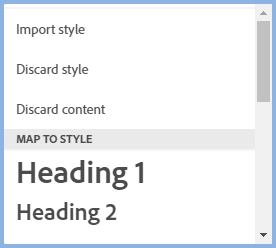
Using the dropdowns, you can change the styles that automapping has applied.
- Import Style will create the style in a second CSS with the name in the format <word_doc_name.css>.
- Discard Style maps any style in Word, including headings, to the <p> tag in the CSS used for style mapping.
- Discard Content allows you to discard any content with the selected Word style.
- Map to Style, you will see the styles defined in your CSS. You can map to any of those.
- There is also an option to map to Pre to format text that looks like code.
The styles that can be mapped will be applied in the topic(s) created and will use the definitions in the style mapping CSS that will be linked to the topic. Going forward, any changes to your CSS would then be applied to the mapped styles in the imported topic(s) in the same way as all other topics.
If you want the topic(s) that will be created to look the same as they did in Word, set the Mapped Style to Import Style for each style.
 If you have styles in Word and want to change them in RoboHelp after importing, add a style to your CSS with a name such as Reformat and set the font for that with a garish colour. Then map those styles to Reformat. After the import you can go through the topic(s) created and apply different styles as required. The garish colour will make them easy to find.
Paragraph Settings
|
|
On the left you will see the Paragraph styles found in the Word document in the Word Style column with RoboHelp's automapping on the right. For the document being imported here, Adobe RoboHelp has automapped Heading 1, Heading 2 and Normal. CSSTest has not been found in the CSS fAdobe RoboHelpile used for style mapping so Import Word Style has been suggested. You can change that as required. If your document has ordered and/or unordered lists you will see one Word style, ListParagraph. That is because the way Word creates lists makes it impossible to map the individual lists. Here you should select Import Style.
|

Character Settings
|
|
This works in the same way as Paragraph Settings but for any Character styles found in the Word document. Character styles are shown in Word's style pod and should not be confused with styling applied from Word's toolbar icons. |

Hyperlink Settings
|
|
Hyperlinks can be imported or mapped to an existing hyperlink style in your CSS.
|
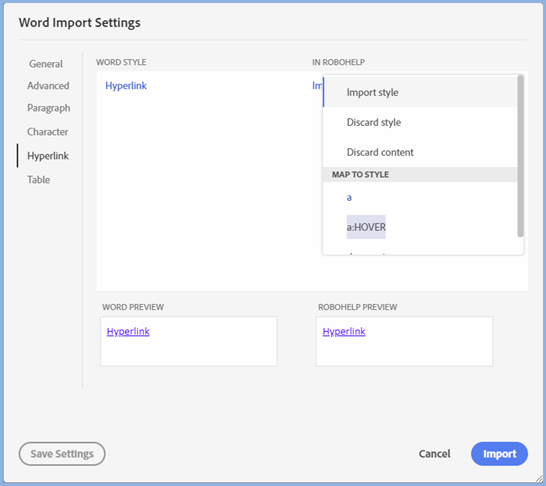
Table Settings
|
|
Any tables in your Word document can be mapped to table styles defined in your CSS.
|

Saving Your Settings
Before you click Import, if you have made any changes to the settings that you want to use again, click Save Settings. You can select any saved WSF file whenever you import.
Post Import
The Styles as Imported
On import, Adobe RoboHelp will apply the CSS used for Style Mapping to the topic(s) created, as far as the settings allow. It will not make any changes to that CSS file. Where the mapping settings require some additional style definitions, they will be created in the <word_doc_name.css> file that is described under Automapping above.
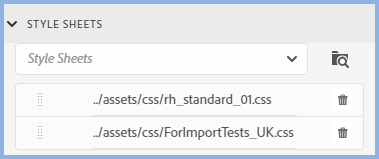
Look in Properties > Topic > Style Sheets and you will see two style sheets applied. <word_doc_name.css> contains the definitions that were not in the CSS used for style mapping.
You can leave the imported topics with those two CSS files applied and for many users that will be a perfectly acceptable way of working.
Getting All Styles Into Your Main CSS
Some users however will want to ensure that any future changes they make to the CSS file used for style mapping will also work in the topic(s) created by the import. To do that it is necessary to take a look at what is in <word_doc_name.css>.
- If there is no <word_doc_name.css>, then everything was mapped with no need for additional style definitions.
- If there is a <word_doc_name.css>, then some additional CSS was needed and you need to consider moving that to your main CSS.
In the image under Paragraph Settings above, you will see CSSTest could not be mapped so the setting was "Import Word Style". That style will have been created in <word_doc_name.css>. You can cut it from there and paste it in to your main CSS. If that was the only style in <word_doc_name.css> you could delete that CSS and the topic would still show correctly.
You then repeat that for everything in <word_doc_name.css> until there is nothing left and the file can be deleted.
Lists
Because of the way Word creates lists, they cannot be mapped to any list styles in your CSS. Each ordered (numbered) and unordered (bulleted) lists will have a list style created in the <word_doc_name.css> file.
- If the appearance of the topic is what you want and you are OK with retaining the extra CSS file, you can accept the topic as it is.
- If you want change the lists to whatever is defined your main CSS then go to Properties > Styles and select Lists. Click in a list and you will see which list style has been created. Apply the list style you want to use. Repeat for all the lists until they all use a style from your main CSS. With that done, you can delete that list style from <word_doc_name.css>.
- Alternatively you can apply one of the predefined list styles in the toolbar.
Linking Word Documents
- Link to File is the first step in linking Word documents. Select Link > Link File and browse to any DOCX file. A copy of the document is made within the project and Adobe RoboHelp monitors both the source and the copy for changes. At this point the document will show a green arrow.
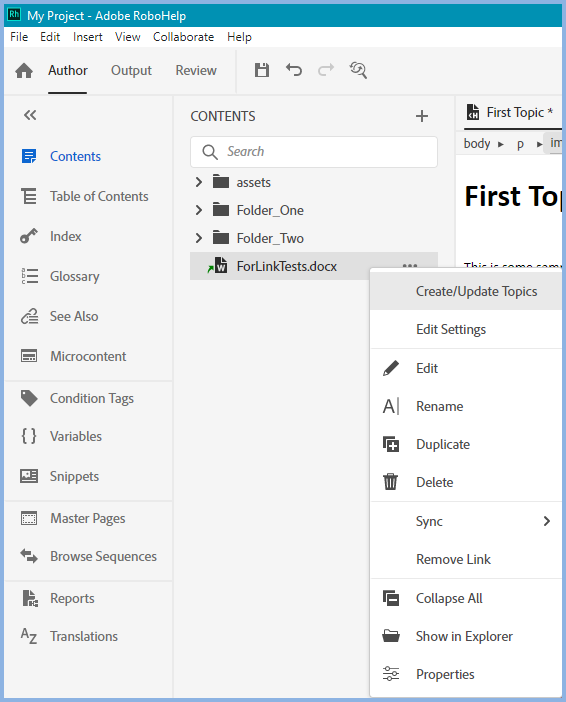
- Having created the link to the document, you then use Create/Update to create the topics. When the DOCX file is displayed in the Contents Panel, hover over it and select Create Topic(s) in the Options menu and your topic(s) will be created. The settings for the linked document will be whatever is defined in the default wsf file selected in Project Settings. There is a menu option Edit Settings as below. Click that to change the settings that will be applied to the default wsf file as defined in Project Settings.
- Later if the original document you have linked to is amended, the arrow will be red and you need to decide whether you want to update the project or leave it as it is.
- If you want to update the topics with the changes that have been made in Word, click Sync>Source to Project so that the arrow changes to green, then click Create>Update.
- The Sync options are otherwise for linked files that can be modified in Adobe RoboHelp and that would include images as you can set up a third party app to modify what is in Adobe RoboHelp. Any changed image(s) that are linked can then be copied back to source.
-
You should not edit the topics created from linked Word files. These changes would be lost when you again create/update the topics for your updated Word file.
- As you cannot edit Word documents in Adobe RoboHelp, Sync>Project to Source should not be used. You change the topic(s) but next time you Create/Update those changes will be lost. It is not intended that you edit such topics.
 It is possible to edit the copy within the project using Word or any tool that will edit a DOCX file. If that copy is changed the arrow will change to orange and Sync > Project to Source can be used. However, it is recommended that all editing is done directly to the source file, not the copy within Adobe RoboHelp.
You can make changes to the topics created when you click Create/Update Topics and they will be in the output you generate. Note though that the changes will all be lost next time you update.
FrameMaker Documents
FrameMaker import and linking is included with Adobe RoboHelp. You need FrameMaker 2020 Update 2. It works in broadly the same way as Word described above.
FrameMaker documents cannot be imported into or linked to Adobe RoboHelp in the Mac version as FrameMaker is not available on the Mac operating system.
Donations
If you find the information and tutorials on my site save you time figuring it out for yourself and help improve what you produce, please consider making a small donation.