Lists and Autonumbering
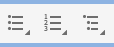
The standard toolbar has three list options, unordered lists (bullets), ordered lists (single level numbering) and multilevel lists.
Unordered Lists - Bullets
Click the Bulleted List Styles icon on the toolbar and start writing your list or select existing content and then click the icon to convert the list.
To revert a list item to an ordinary paragraph, click the icon again and select the None option.
Ordered Lists - Numbered
Click the Numbered List Styles icon on the toolbar and start writing your list or select existing content and then click the icon to convert the list.
To revert a list item to an ordinary paragraph, click the icon again and select the None option.
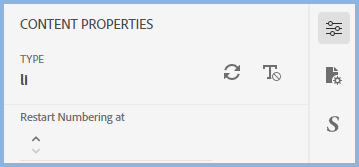
When you start a second list in a topic, the numbering will automatically start at 1. If you want the numbering to continue, click in the list and in Content Properties you will see Restart Numbering.
Multilevel Lists
Click the Multilevel List Styles icon on the toolbar and start writing your list or select existing content and then click the icon to convert the list. Use the Tab key to indent a paragraph and change its bullet or number.
To revert a list item to an ordinary paragraph, click the icon again and select the None option.
 CSS3 enforces a strict interpretation of the different levels in the list. You cannot have a Level 3 item immediately after a Level 1 item. The order must always be Level 1, Level 2, Level 3 etc. There is a workaround for this as below.
How to Add an Out of Order Level
Create an li style such as this where the list style is whatever you want, "a, b, c" in this example.
li.alpha1 {
list-style: lower-alpha;
margin-left: 11pt;
}
li.alpha1::before {
content: none !important;
}
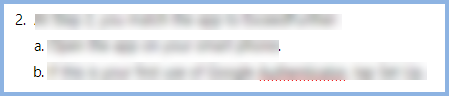
Apply that style where you want the out of order level. Here this list requires an indented paragraph with a bullet at Level2 but here lower-alpha letters are required. After entering Item 2, the Enter key was pressed and then the li.alpha1 class was applied.
Standard or Advanced Formatting?
On opening the style editor for a list style, you will see an Advanced Formatting option. Next to it is an information icon and on selecting/deselecting the check box, an information dialog will display.

Earlier versions of 2020 did not separate the advanced settings resulting in some users reporting that their lists did not appear the same in all browsers. The reason for this is the impact a browser's own CSS has on the list formatting. All browsers apply their own CSS so theoretically any content can display diferently in different browsers. Normally the CSS you apply will override the browser CSS and the content will look the same of be very close. Lists are a little more tricky.
Standard Formatting
The various setting available in Standard Formatting have been selected to ensure consistency as far as possible. Any styling applied with the Standard Formatting should work consistently in the main browsers.
Advanced Formatting
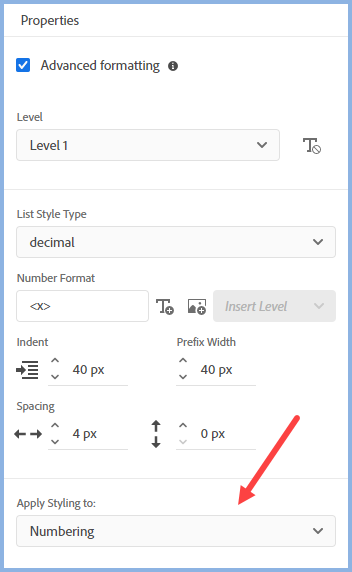
When you select the Advanced Formatting check box you will see the additional fields highlighted below. You can set the fields here separately for each level, also note the Apply Styling To dropdown as with Advanced Formatting you can define, for example, one colour for your bullets and another for the content.
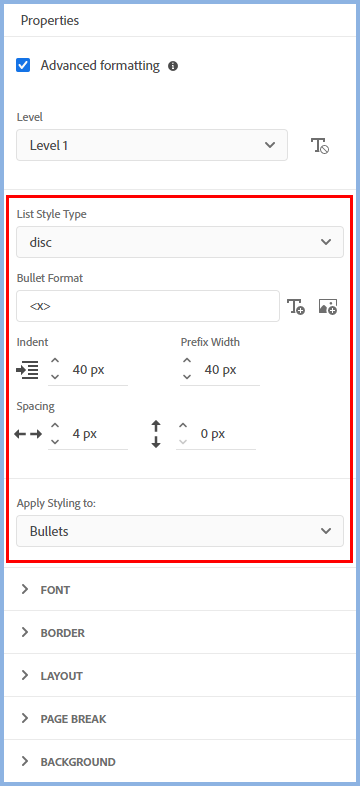
Whilst you apply these settings for each level, note that if you choose to return to Standard Formatting, the settings for these fields will be removed for all levels. If you are having a problem with one level only, you can try to fix that by clicking the Clear Level Formatting next to the Bullet Format field.
Upgrading a Project
When you upgrade a project to Adobe RoboHelp 2020 to this version and select a list style to edit, the CSS will be scanned and the check box will be selected or not to indicate whether or not any advanced formatting has been applied.
 If you do want to revert to the standard settings it is recommended that you create a backup before proceeding.
Select the CSS in the Contents panel, right click and select Duplicate to duplicate the whole CSS file.
Autonumbering
Ordered Lists and Autonumber - What's the difference?
By default a second ordered list within a topic will start again at 1 whereas all instances of an autonumbered style will be sequential throughout a topic.
In both cases though, you can change the numbering in Properties.
Creating an Autonumbered Style
Double click your CSS file in Adobe RoboHelp to open it in the CSS editor.
Select an existing style or create a new one.
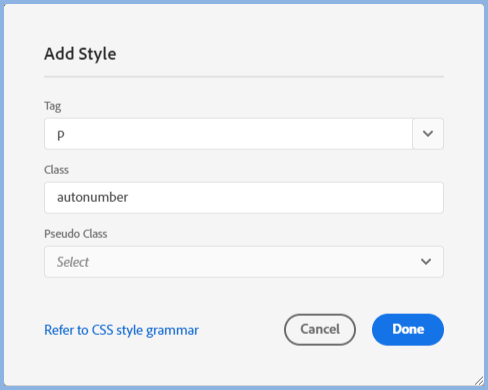
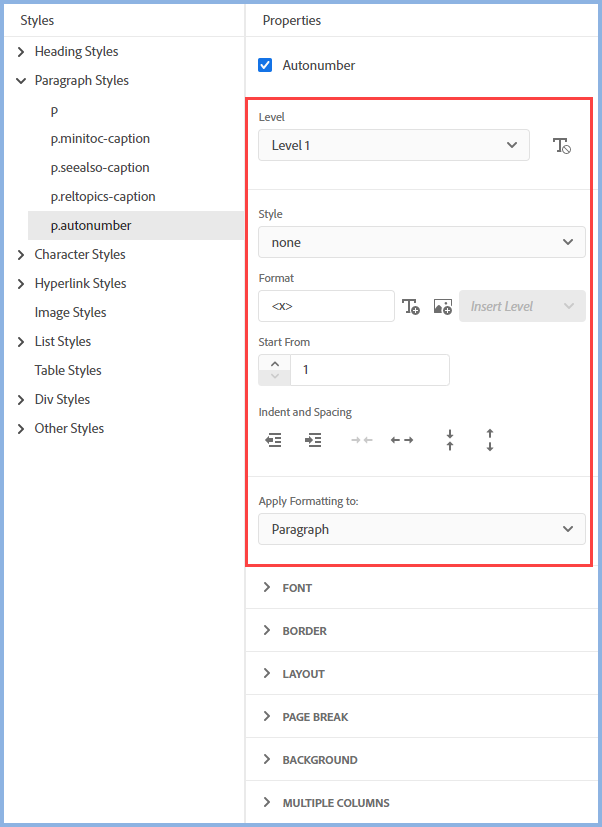
Select the Autonumber check box in the Properties to display the additional fields highlighted below. Set the format you want including images. Note the Apply Formatting To dropdown that enables you to apply different formatting to the numbering and the content.
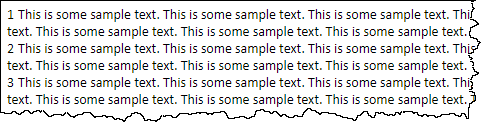
Default Autonumbering Style
By default the text will wrap around the number as shown below. Also if you create a Word output, the paragraphs will be indented much further than in an online output.
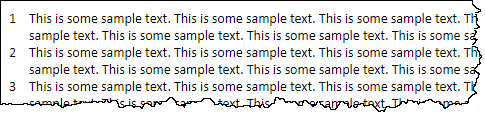
If you want the style to look like the image below and appear the same way in Word, some additional steps are needed.
-
Set "Apply Formatting To" to Numbering.
-
Set the numbering to Decimal or whatever format you prefer.
-
Go to Layout Settings and select Absolute in the Position dropdown. At this point the numbering will disappear from the preview.
-
Repeatedly click the indent icon until you see the numbering return, approximately ten clicks.
-
See how the style aligns in a topic and make further adjustments as required.
How To Use Autonumbering and How Not To
- Autonumbering is intended mainly for numbering Images, Headings and paragraphs throughout a document. For example in legal documents.
- Various levels would be set for say the Heading 1 style so that Level 2 for example would look like it is a Heading 2 but with 1.1 numbering.
- Lists set up using multilevel list styles must follow the structure so Level 2 must follow Level 1 and so on, you cannot skip to Level 3 to get the appearance you want. Autonumbering can skip levels but there are considerations.
- In a PDF output the numbering will be continuous throughout the document unless you set every topic to restart at 1.
- In a Word output, indentation may be completely wrong.
- Accessibility requirements will not be met. Screen readers advise the user that a list has been reached when they get to content formatted as a true list. When they reach content formatted with autonumbering, they will announce a paragraph.
List Styles
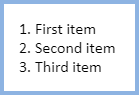
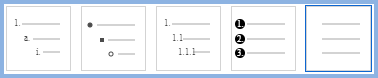
Adobe RoboHelp comes with default list styles. You can use any of the default lists as supplied or you can customise them or you can create new list styles. Start by selecting the required list style from the toolbar. Here the numbered list icon has been selected and below the default styles are shown below. For the purposes of showing the options, the first option Decimal List is selected.

In your topic it will look like this.
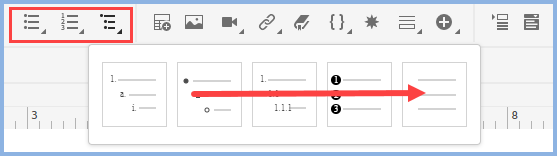
The Multilevel list toolbar icon displays this list that includes a list with black circled numbers.
Customised List Styles
If you make changes to the supplied Decimal style, all Decimal lists will have your customisation applied when you select Decimal on the toolbar in future. If that is not what you want, create a new style first as shown later.
Open the CSS file by double clicking it in the Contents panel.
To Modify An Existing Style
Click on the style and follow the steps under Properties.
To Create a New Style Based On An Existing Style
In the context menu click the style and select Duplicate.
Put focus on the new style and follow the steps under Properties.
To Create a New Style From Scratch
In the context menu click List Styles or any existing list style and select New.
Put focus on the new style and follow the steps under Properties.
Example
To create the style shown here, the settings would be as below. Many other styles can be created.
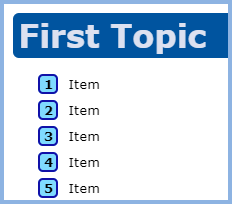
Create a copy of an existing list style and name it as required. With focus on the new style to be edited in the list of styles, make sure Level is set to Level 1, Style is set to Decimal, Applying Formatting To is set to prefix and remove the full stop after <x> in the Format field.
The Apply Formatting To dropdown controls whether your changes apply to the Numbering / Bullets or the Content. Make sure the required option is selected.
Below those settings are the various options for customising.
In this example, it is decided the required style is as below. The settings for that are as below.
|
Font |
Click Bold |
|
Alignment |
Set the spacing to 2 |
|
Border |
Set the colour and width required. The border here is 2px. Set the radius if you want rounded corners rather than square corners. The radius shown is 5px. |
|
Layout |
Set the margins and padding as required. The settings shown are 10px right margin and 4px left padding. |
|
Background |
Set the fill colour required. |
Alignment
When a numbered list reaches double digits, the supplied styles will keep the text in line with the items above. It also works with triple digits if you get that far!
There are also controls to set the position of the number or bullet and the gap between that and the list content.
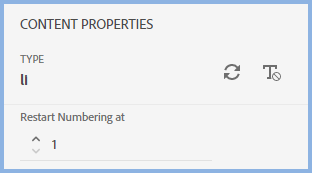
Restart Numbering
If you need to restart numbering, click in the list where you want the numbering to restart. In Properties > General tab you will see a field where you can set the number to what you want. The field will not show unless the list item has some content in it.
Upgrading Lists From Adobe RoboHelp Classic Versions
Lists upgraded from Classic versions of Adobe RoboHelp may not look quite the same in Adobe RoboHelp as CSS3 rules are applied. You may need to edit your list styles to meet your requirements under CSS3 rules. The simpler your lists in Classic versions, the more likely the lists will upgrade as required.
If you have applied inlne styling to any numbered or bulleted lists (ordered or unordered lists) in Classic versions, it will remain applied in Adobe RoboHelp. However, inline styling applied to multi-level lists will not carry through to RoboHelp 2019.
It is worth viewing the List and table style editing video to see how to edit your list styles in RoboHelp 2019. The process is the same in 2020.
Lists With Paragraph Styles Superimposed
In Classic versions many authors created a list and then added a paragraph style to the list as well. It was a quick way of getting the desired appearance. The change to CSS3 and HTML5 can create issues on upgrading with that method.
Correcting the Issues
Before following these steps create a backup copy of your project.
Select all the contents of a single list, then click the None icon in any of the list style icons on the toolbar.
Your list should now just have P tags applied. Check that in the source code.
Next in Author view select the whole list and apply your list style from the Styles panel.
If it still does not look correct:-
- Check the code to ensure only LI tags have been applied and there is no inline styling. If there is some inline styling affecting the appearance, go back to Author view and select the list, then go to Content Properties and click the Clear Formatting icon.

- Create a new topic and create a new list in using your list style. If that is not the desired appearance your list style needs modifying. Open your CSS in the CSS editor and make changes there. You should find that once you have the new list working as desired, the old lists are correct and the new topic can be deleted.
Donations
If you find the information and tutorials on my site save you time figuring it out for yourself and help improve what you produce, please consider making a small donation.