RoboHelp 8 - Importing and Linking
In RoboHelp 8, importing a document has changed and there is a new option to link to a document. Both options handle Word and FrameMaker documents, import also allows you to import PDF files.
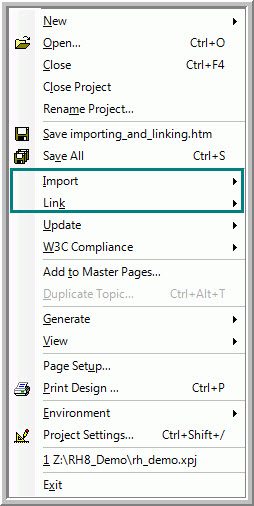
The options are accessed from the File menu and the process is broadly the same for both Word and FrameMaker documents. The differences are in the detail.
What's the difference?
|
Import |
When you import a document, RoboHelp creates HTML topics that you then edit in RoboHelp. The document remains in its original location and is not copied into the project folders. If the document changes, those changes will not be reflected in RoboHelp. The styles are controlled by the CSS applied in RoboHelp. |
|
Link by copy |
The source document will be copied into the project folders on your hard disk. Editing will be normally be done in the source application (Word or FrameMaker) but you can also edit in RoboHelp. When you generate the help, you will be prompted and you can update the RoboHelp topic or leave it out of sync if required. If you move the project, for example from your desktop to your laptop, the link will need to be repaired. The document will show as a broken link. |
|
Link by reference |
The source document will remain in its original location, which can be anywhere on your network. Editing will be normally be done in the source application (Word or FrameMaker) but you can also edit in RoboHelp. When you generate the help, you will be prompted and you can update the RoboHelp topic or leave it out of sync if required. |
Importing
This section describes the process of importing a Word document; the process is started as shown in Image 1 above.
Content Settings
If the document being imported has a table of contents, an index or a glossary, you have the option of importing it. You can import it into its own TOC, index or glossary or you can add it to an existing one.
Import
Click Next to display the Import page of the wizard shown in Image 3 and click the Word document Edit button to access the Conversion Settings shown in Image 4.
Conversion Settings
Paragraph, Character and Table
These headings show the styles used in the Word document. As you highlight them the Style Preview shows the appearance in Word and the default matching that RoboHelp has identified. You can change how RoboHelp mapped the styles by selecting a different RoboHelp Style in the dropdown. You can also edit that styles appearance by using the Edit Style button. That will not affect the style sheet being used for the mapping as RoboHelp creates a new style sheet for every document imported; that is the one where the new style definition will be written.
- For each style that you want RoboHelp to use to create new topics, highlight them and tick the Pagination check box.
- For the styles you want to be used for the Glossary Definition and the Glossary Terms, highlight them and tick check boxes.
Other Settings
|
Setting |
Description |
|
Auto-create CSS styles from inline formatting |
If ticked, any inline styles in the Word document will be converted to CSS character styles. Typically the documents that are imported are created by many people who do not set up proper styles in Word, most of us are guilty of that. This option enable you to easily create proper styles so that subsequent changes are easily made. |
|
Convert References to hyperlinks |
References are a Word characteristic. This option enables you to convert them to hyperlinks. |
|
Convert Header |
In previous versions of RoboHelp, you could import the Header and Footer or not. What you could not do was import either. Now you can choose to import just one or both. |
|
Convert Footer |
|
|
Convert Word list to |
If you do not tick this field, any lists in the document being imported will appear to be proper lists in the topics. However, if you press Enter after any such list, you will not get another bullet or number so that you can add to the list. You need to tick this option and then select HTML List for a simple bulleted or numbered list or select RoboHelp List to use the new multi-level list function. |
|
Context Sensitive Help Marker |
This field will be used when importing FrameMaker documents that also use this screen. Ignore it when importing from Word. |
|
Topic Name Pattern |
You can select a pattern for creating the topic names.
|
Saving the Import Settings
Adobe seem to have missed a trick as the import settings are not intended to be saved. Working with Rick Stone, we found a workaround that is OK in a single project but it runs into a bug if you try to use the ISF file in another project.
- Click File > Link > Word Document as shown in Image 1 and browse to the document you want to import.
- An icon will appear in Project Manager representing the linked document. The icon changes to indicate its state. See the online help for illustrations of the different icons.
- Click File > Project Settings > Import Tab >
- Click the Word Document Edit button and create the settings you want.
- OK those settings and then Save them.
- Now start the import process as above and the ISF file you saved will appear as the ISF file in Image 3.
- Complete the import.
- Delete the icon that will have appeared in Project Manager representing the linked document.
If you need to import further documents, the ISF file will you saved in Step 4 will be used.
The bug is that if you try to use that ISF file in another project, some of the settings may be lost. I found the Pagination settings did not stick, there may be others.
I would like to see the Import routine change to allow the settings to be saved as it can be with the Linking routine.
Linking
- Click File > Link > Word Document as shown in Image 1 and browse to the document you want to import.
- An icon will appear in Project Manager representing the linked document.
- Click File > Project Settings > Import Tab >
- Select previously created settings if applicable.
- Select the Link Option (described earlier in this topic).
- If you are not using previously saved settings, click the Word Document Edit button and create the settings you want. Use the pagination check box to determine which styles determine how new topics are created. OK those settings.
You can save them for use when linking documents in other projects, click the Export button. The bug referred to in Saving the Import Settings does not occur when the ISF is used for linking. - Right click the Word document icon to access the context menu and select Generate to create topics based on the Word document.
- To update these topics later you will see various Update options on the same context menu. See Synchronizing linked Word documents with RoboHelp projects in the online help for information on these options.
Donations
If you find the information and tutorials on my site save you time figuring it out for yourself and help improve what you produce, please consider making a small donation.