Single Sourcing, Tags and Expressions
Single sourcing is a method of applying condition tags to topics, content in topics, toc books and pages and index entries so that the tag can be included in a condition expression to exclude that content from a chosen output. For example, a single topic could contain additional information that is only to be seen in certain outputs, perhaps a printed output needs an image not required in online versions. Essentially it means a single project (source) can produce multiple outputs, each with different content. This is done by using Condition Tags.
How Do Condition Tags Work?
The concept is best explained using an example. Let's say you are producing a knowledge base for your company with some content that applies to everyone, some applies only US readers, some only applies to UK readers and some only applies to Canadian readers. Also end users must not see each others content. In that scenario Dynamic Content Filtering would not work as they could all see the content for the others. You need to generate separate outputs for each group.
In this example you would create three condition tags labelled US, UK and Canada.

The screenshot shows those condition tag groups have been set up here by clicking the + icon and creating them in the Audience Group. There are default groups that you can remove or add to in Project Settings.
Here Audience suits our purpose and the predefined Platform condition tags have been left in. Any group that does not have a condition tag defined will not be shown in the window below.
 When you set the color for any tag, also set the opacity to low so that the text is still legible. Note how the content for Canada and UK is easier to read than the content for the US in the image below.
With the required tags set up, you now create your content. Here paragraphs have been set up with content for a specific audience.
Simply select the text to which the condition tag is to be applied, right click and select Apply Condition Tags. To apply a tag to a whole paragraph, click in the paragraph and then apply the tag.

 In the Preview you can select specific condition tags and expressions to see the effect of using the condition tags and expressions. Be careful applying condition tags to both the topic and to content. Test that thoroughly as it can have unintended results.
Using Condition Tags In an Expression
In Output > Output Settings, click Condition Expressions, then click the + icon to create an expression.
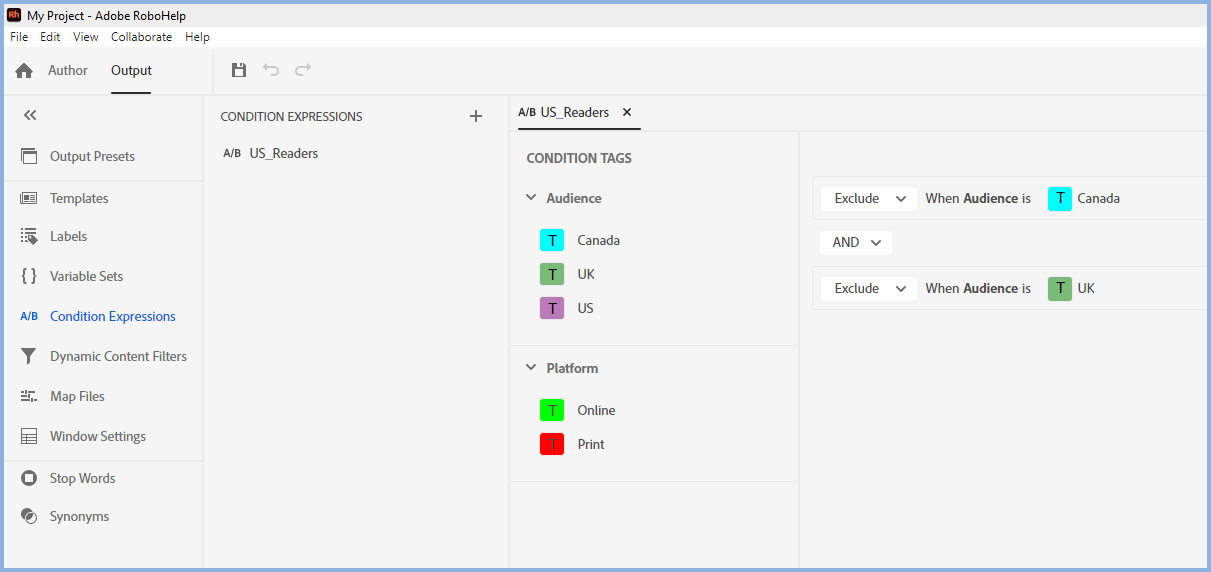
As you drag tags, by default Adobe RoboHelp will set the tag to be excluded and additional tags will be set to be AND.
Thus if you drag both UK and Canada, by default the expression will be Exclude UK AND Exclude Canada so the output will exclude anything that has the UK or Canada condition tag applied. It will include content that has no tags or other tags.
For other purposes, you can easily change Exclude to Include and you can change AND to OR.
Generating an Output
By using different expressions, you can generate different outputs for different audiences, such as in the example above, or you could apply the Print condition tag to images and then exclude the images from online help but include them in Printed Documentation and so on.
In the Output Presets you can either select the required expression each time you generate or you can create one or more presets and set each one up with a specific expression. In this example you might set up Responsive HTML5 US, Responsive HTML5 UK and Responsive HTML5 Canada.
Further Information
Matt Sullivan has produced a video explanation about the use of Conditional Build Tags and Conditional Expressions. You can find it here.
Also Beth Gerber of Lightext has produced a webinar showing how to create online and printed outputs from the same source topics. You can find it here.
Donations
If you find the information and tutorials on my site save you time figuring it out for yourself and help improve what you produce, please consider making a small donation.