RoboHelp 2019 - See Also and Related Topics
See Also and Related Topics have been part of online help for a long time and continue to be part of RoboHelp. They help the author direct users to topics they believe to be useful to the end user without having to work through a list of search results.
What's the Difference?
See Also
You create a keyword and associate a group of topics with that keyword. You then select the keyword(s) that appear in each topic under See Also. You create a group once and the group(s) will then appear in any topic with the linked keyword(s). You only need to add the keyword, you don't have to keep creating a list of topics.
Related Topics
With Related Topics the list of topics is created uniquely for each topic.
Setting Up See Also
 You no longer have to add the See Also control to every topic. Instead you can add it to a master page. Where a topic has one or more See Also keywords set up, the control will appear automatically but otherwise the control will not display. This is explained in more detail below.
Creating the Keywords and Configuring What Appears Where
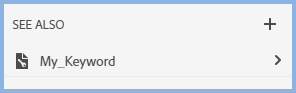
Click See Also in the left Project Toolbar and click the + icon to create a keyword. In an upgraded project you will see the previously created keywords.

Enter the keyword in the dialog that is displayed.

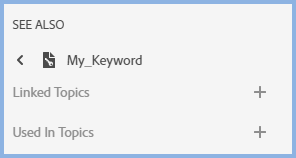
When you click Done, the keyword will be listed. Click the > icon to show Linked Topics and Used In Topics.
It is important to understand the difference between Linked Topics and Used In topics.
- Linked Topics are the topics that will be listed when the user views See Also.
- Used In Topics are the topics that have a See Also section.
First click the + icon for Linked Topics to link the topics you want associated with the keyword, the list of topics that will appear in See Also for users.
There are then options for how you work.
- You can click the + icon and set which topics will list the Linked Topics associated with this keyword OR
- You can open a topic and go to Properties > Topic > See Also and select keywords there.
Whichever method you choose, the keywords will be listed in both locations.
You also need to set up the display of the See Also control.
Displaying the See Also List
The steps above set up what topics are to be listed and in which topics. The next step is to make that list visible to the user.
In earlier versions of Adobe RoboHelp this had to be set up in every topic. You can still work that way but there is a new option, add See Also to a master page. Where a topic has been set up to use one or more keywords, either in the Used In Topics section or in the topic properties, Variable "ProdName" is not defined will show the list. If no topics are applicable to a topic, the See Also section will not appear.
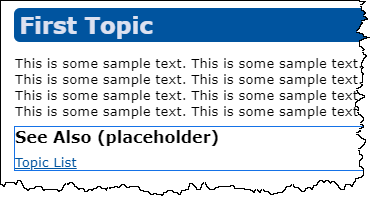
The standard toolbar has two icons allowing you to add placeholders in topics. Place the cursor in the topic where you want the See Also links to be shown and click the See Also Placeholder icon.

If you are adding it to a master page, use the same icons to insert the control between the body placeholder and the footer.
In the topic you will see the default caption and Topic List while in source view.
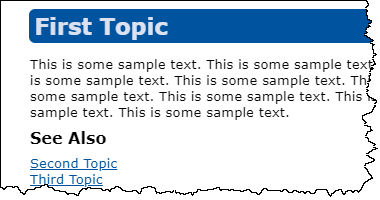
In Preview and outputs you will see the titles of the topics you have linked to the keyword(s) associated with the displayed topic.
Formatting the See Also Caption
Click in the placeholder line and go to Properties. Here you can define the caption users will see. You can also change the font by selecting a style from your CSS or applying inline formatting.
Formatting the See Also Links
To change the default appearance of the list of topics, click next to list and go to Properties > Styles > Lists.
Select one of your pre-existing list styles or create a new one with a name such as seealso-list-item to clearly identify its purpose. To change the appearance of that list style, click the pencil icon alongside to open the CSS editor. According to the list style you select, the list of topics can be numbered or bulleted if required.
Setting Up Related Topics
Related Topics are specific to each topic so first you open the topic where the related topics are to be listed. Then place the cursor where you want the related topics to be shown and click the Insert Related Topics Placeholder icon.

In source view you will see the placeholder as below. In Preview and outputs you will see the titles of the topics you have linked with whatever caption you have defined in Properties.
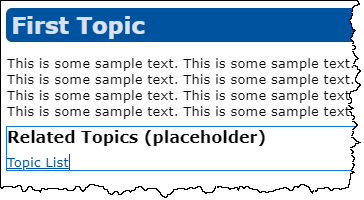
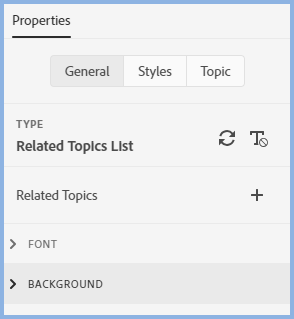
To link topics place the cursor next to Topic List and go to Properties > General. Click the + icon next to Related Topics to select the topics you want users to see.
Formatting the Related Topics Caption
Click in the placeholder line and go to Properties. Here you can define the caption users will see. You can also change the font by selecting a style from your CSS or applying inline formatting.
Formatting the Related Topics Links
To change the default appearance of the list of topics, click next to list and go to Properties > Styles > Lists.
Select one of your pre-existing list styles or create a new one with a name such as reltopics-list-item to clearly identify its purpose. To change the appearance of that list style, click the pencil icon alongside to open the CSS editor. According to the list style you select, the list of topics can be numbered or bulleted if required.
 Related Topics is retained for legacy projects. You can also just add a heading in your topics and drag links from the Contents panel.
Donations
If you find the information and tutorials on my site save you time figuring it out for yourself and help improve what you produce, please consider making a small donation.