Right to Left WebHelp
What's covered?
The Classic versions of RoboHelp did not support online help for right to left languages. That presented Nokia's Pertti Metsanheimo with a problem but with the assistance of Willam van Weelden, he was able to produce the procedure set out below using RoboHelp 7. It may not work in later versions.
Please note the method is for WebHelp only, not for compiled Microsoft HTML Help (CHM).
FrameMaker now supports right to left languages and can generate a RoboHelp output. That might be a better solution. RoboHelp 2019 has right to left skins that can work with content produced in external editors that support right to left editing.
09 Jul 2020 - The New UI version of RoboHelp has a right to left version of the Azure Blue skin. Using that is a much easier solution.
Overview of the steps
- Create a RoboHelp project in a left to right language.
- Create a copy of the project for each language. It helps to include the name of the language in the root folder name.
- Translate as described in Get Your Files Translated.
- Copy the edited files back into the appropriate copy project using Windows Explorer.
- Generate the webhelp output.
- At this stage, the topics will be right to left but the navigation pane and buttons will be in their usual position. Changing that is described in Post Generation Processing.
Assumptions
- You are using a version of Robohelp that uses UTF-8 encoding. My results are with version 7.02.01
- The topics in your original left to right project do not use any RoboHelp specific features such as conditional build tags, snippets and variables. It may be possible to use these features with additional steps but that is outside the scope of these procedures.
- You are comfortable with editing HTML files (and similar) in a text editor. Notepad can be used but for editing a large number of file you may prefer to use Helpware's FAR or PSPad. Be careful using their find and replace function and the character sets used.
Tools
- Notepad will work for editing the necessary files, if you only need to change a few. For replacing tags or strings in larger amounts of files, I have used Helpware FAR and PSPad editor. Just be careful with charactersets (UTF-8, ANSI, Windows-1256, etc) and what exactly you ask them to find and replace.
- If you need to create RTL WebHelps often, your friendly engineer can write a few lines of code that will do it automagically. We have a FinalBuilder 6 project that will extract the resource files from version control, generate the helps, make the changes listed in the Post Generation Processing section, below, put the output files where we want them, and inform those who need to know.
Get your files translated
|
.htm files |
Translate texts Replace the <html> tag at the top of every resource HTML file with <html dir=RTL> If pages contain tables, you may have to edit the table formatting, especially “border-right” and “border-left” definitions so that borders appear where they should. |
|
.hhc and .hhk files |
Translate just like in any other language |
|
.hhp file |
The Title in the .hhp file may be localised |
|
RoboHHRE.lng |
This file contains texts that appear on the “Help UI”. Get the texts translated. There are two identical RoboHHRE.lng files in the project: one at the root level in the folder structure, one in the ‘!Language!\ [Language-identifier] folder. I put my translated file in the ‘en_UK’ folder because I did not manage to add language names to the Robohelp Project Settings. |
|
.css |
You may need to edit the .css file that you are using for the help. larger fonts may be needed if you use very small ones in the original left and right alignment may need to be swapped in some styles, eg. margin-left: and margin-right: |
Using Windows Explorer, copy these files into the copy project for the relevant language. The file names must not be changed in any way.
It makes sense to name the root folder of the localised project according to the language
Generate the help
- Open the help project using the .xpj file.
- Check Project Settings (File > Project Settings):
- Select Primary Layout (WebHelp)
- Select Language. Choose the language that matches the location of the translated RoboHHRE.lng file.
- Generate help
- Go via the File menu if you want to check the settings
- Click the Generate Primary Layout button to start Generating immediately.
Post Generation Processing
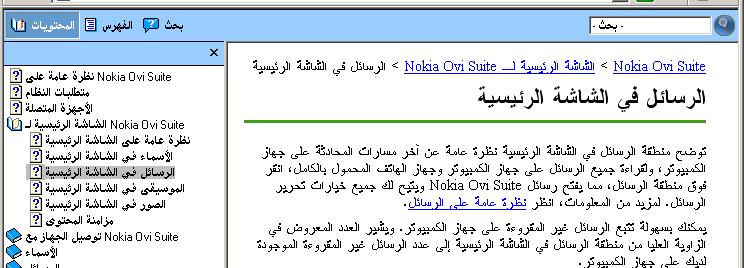
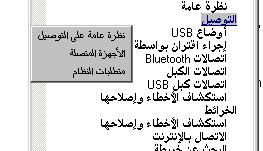
At this point your help will look like this. Whilst the topics are right to left aligned, the navigation pane and tool bar will be in their normal positions.
Update 18th August 2013. In RoboHelp 10 some of line numbers have changed but you should be able to locate them from the information below.
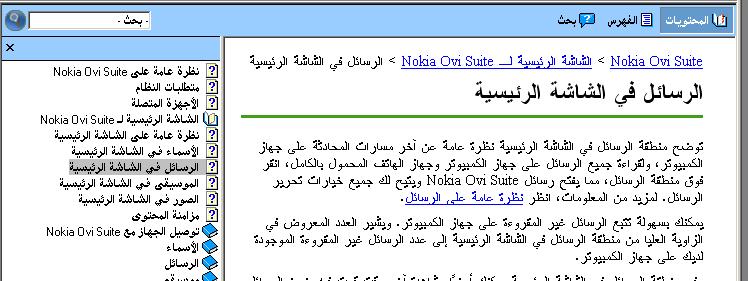
| Replace the <html> tag at the top of all output HTML files with <html dir=RTL> |
This corrects the toolbar position and the navigation pane is right to left aligned. However, the position and indentation are not right.
|
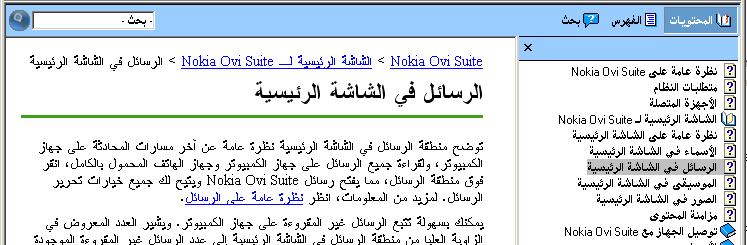
| Edit file whskin_frmset01.htm to put the Navigation Pane on the right: |
Now the navigation pane is right aligned but the indentation is still wrong.
|
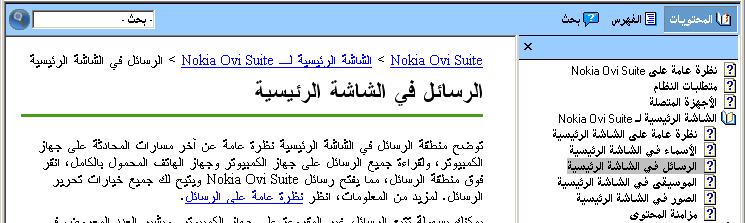
| Edit files to correct Table of Contents, Index and Glossary indentations |
Change all instances of “margin-left” to “margin-right” Now the indentation is correct.
|
| Edit whibody.htm to get the Index popups to align right in IE |
|
| A missing characterset definition in a HTML file can cause display problems. |
It may be safest to add it to the <head> section in files where it is missing: <meta http-equiv="Content-Type" content="text/html; charset=utf-8"> |
Future changes
Adding and Removing Topics
There are two ways in which you can add and remove topics from the project for any language.
Using RoboHelp
- Open the project using the XPJ file.
- Delete any topics that are no longer required in the usual way.
- Create new topics with the required filename and topic title. See below for information about creating the content.
Using the HHP file
You can make the necessary changes to the HHP file and then use RoboHelp to browse to that file to open the project. You will be prompted to use the existing XPJ file, click No.
New Content
- Take a copy of the file to be edited and amend / create the required content.
- Using Windows Explorer, copy the updated file back into the project.
Donations
If you find the information and tutorials on my site save you time figuring it out for yourself and help improve what you produce, please consider making a small donation.