Linking Word Documents to RoboHelp Classic Versions
What's Covered
Linking was introduced in RoboHelp 7. This page is about the screens you will encounter when linking Word documents to RoboHelp 9 and above up to and including RoboHelp 2019 Classic. If you are using RoboHelp New UI, see the RoboHelp Tour for the steps. It is a much improved process.
If your are using RoboHelp 9, it is vital that Service Release 9.0.2 is applied to your machine as that updated the process in important ways. What is described below will not work unless that service release is applied.
The process for RoboHelp 9 is the same for RoboHelp 10 and above except that in later versions you will be given the option during the import to automap the styles. RoboHelp will then match any Word styles with identical style names found in your CSS.
Introduction
Parts of the linking process are shared with importing and you may find it easier to understand linking if you look at importing first. In describing the process here I will be using the same Word document that I used when describing importing. I do recommend that you use that document to follow these steps so that you know you are getting the expected results and what you get is not tainted by something unique to your own documents. Click here to download.
For the purposes of following the process here, please work with a new project so that it is not affected by any settings applied to an existing project.
Before You Start
Typically you will be linking to a document that has been produced by others and over which you have little or no control. However, if you can clean up the document as described in Before You Start in the Importing Using RoboHelp page, it will help get a better end result.
The Process
- Click File > Project Settings > Import Tab. In a new project this is what you will see.
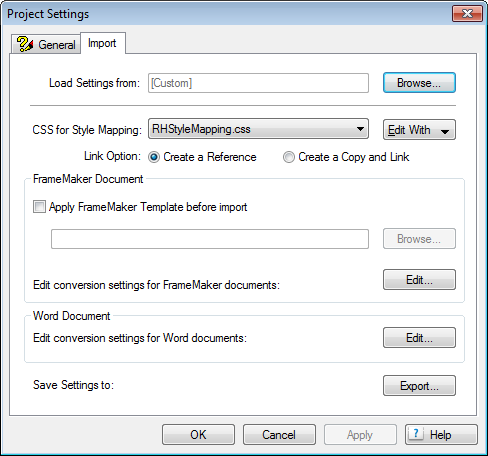
Note the Link Option field.
- If you select Create a Reference, RoboHelp leaves the Word document where it is on your network so that any changes to that original are reflected when you next generate an output.
- If you select Create a Copy and Link, RoboHelp copies the file to the project and any subsequent changes to the original will not reflect when you generate an output. You might want to use this method when there is a document that cannot be used as needed by the owners of the document but where it contains content you need. You would edit your copy and update that as required using Word's Compare with the two copies of the document. Former users of RoboHelp for Word might also use this option so that they can edit in Word.
In the Load Settings From field, if you have previously imported or linked to a Word document and exported the settings, you can reuse them by browsing to the ISF file that was created. Otherwise leave the field unchanged. If you have not selected an ISF file, you will not be able to Edit the Word Document Conversion Settings at this stage.
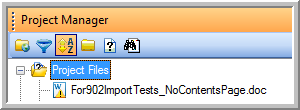
- Click File > Link > Word Document and browse to the document required. For the purposes of this tutorial I suggest you use For902ImportTests.doc from the download and remove the Contents section so that the document starts at Topic 1.
- RoboHelp will then scan that document and show it in Project Manager. The document will show a yellow warning triangle as the project does not yet contain synchronised topics...
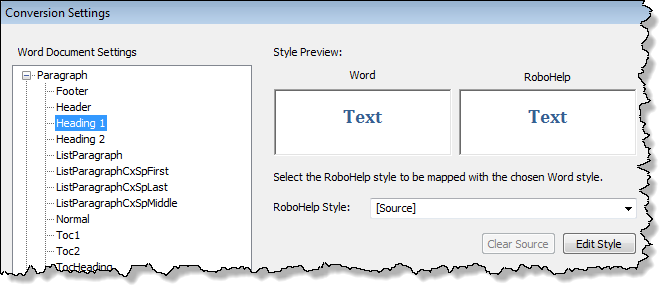
- Now if you return to the Project Settings dialog shown in Step 1, if you click the Word Document Edit button, you will be able to see the styles in the document. The steps here are the same as described in Importing Using RoboHelp. You either edit the settings or browse to a previously saved ISF file. Unlike the import process, you cannot change the settings during the generation or updating of topics. What is defined here applies to all linked documents in the project.
- Having defined the settings either manually or by using a previously saved ISF file, you can now create the topics. Right click the document in Project Manager and select Update > Generate.
- The topics will be generated and the appearance will be inline with your Word document.
- When you link a Word document, there is no option to add the TOC / Index / Glossary to one that already exists in the project as there is when importing. The reason is that RoboHelp would not be able to tidy up redundant entries when you update the link at a later stage.
After the link is created, right click the document in Project Manager and select Properties. A window will open at the Content Settings tab. There you can create a new TOC / Index / or Glossary. Do that and then open the TOC / Index / Glossary that you will use when you generate the help.
-
In the toolbar for the TOC and Index you will find an icon Insert TOC / Index PlaceHolder. Use that and point to the TOC / Index you created, RoboHelp will merge them. You need to update the TOC and Index in Word whenever you update the document. Provided you do that, RoboHelp will take care of updating its TOC and Index whenever you generate.
-
The glossary does not work the same way. You will have to import the glossary created and then edit the main glossary each time.
Document Changes
If you now go to the document and make a change, back in RoboHelp you will note the document again shows the warning triangle to let you know the topics are no longer in synchronisation. If you attempt to generate a fresh output a dialog will be displayed asking if you want to update. Assuming you do, click Yes and you will see a progress bar while RoboHelp updates the topics, then you will see the usual layout dialog.
You do not have to wait until you generate a layout to update the topics. At any time you can right click the document and select one of the options for updating.
HTML Code
The HTML will not be the same as with imported documents but it does display correctly with the documents I have tested.
Editing the Topics
Generally the idea is not to edit the topics created as the update process will overwrite any changes you have made. However, if there are reasons for making changes that you do not want overwritten when the topics are updated in the future, you can prevent specific topics from being overwritten. There is not an option to preserve just specific areas.
Right click the document in Project Manager (not the topic) and select Properties. In the File Update Settings tab, tick the topics that are not to be updated.

Multiple Linked Documents
In Step 4 of The Process I stated that the settings applied in Project Settings will apply to all linked documents. I can envisage scenarios where the requirement would be to have a different appearance for different topics. If that is your requirement, try these methods
Map to Source
When you map the styles, in the RoboHelp Style field set that to the [Source] option. You will then get whatever has been set in each of the Word documents. That will of course only work if the Word document has the styles you want.
Use Preserve Modifications
In Editing the Topics above I explained how you can stop topics created from a linked document from being updated. In theory you can use that to apply different styles to different documents. I say "in theory" simply because I have not tested it. The steps to follow would be:
- Link your first document as described above in The Process and set the mapping as required for this document.
- Export the settings using a file name that identifies it for future use with this document.
- Click the document and then right click to display the context menu.
- Select Update so that your topics are updated.
- Click the document and then right click to display the context menu.
- Select Properties and in the File Update Settings tab, tick all the topics so that they will not be updated again.
Repeat the process for each of your documents in turn applying the different mappings you want.
Whenever you generate a new output you will have to manually check whether the source documents have changed. For any document that has changed:
- Click the document and then right click to display the context menu.
- Select Properties and in the File Update Settings tab, deselect the topics that are to be updated.
- Change the settings in Project Settings to whatever is required for this document and then update the topics. If you exported the settings as recommended in Step 2 above, you can simply load those by browsing to the required file.
- Repeat Steps 5 and 6 above to prevent further changes.
- Repeat for all changed documents.
Donations
If you find the information and tutorials on my site save you time figuring it out for yourself and help improve what you produce, please consider making a small donation.