Importing Word Documents into RoboHelp Classic Versions
What's Covered
This page is about the screens you will encounter when importing Word documents into RoboHelp 9.0.2 and above up to and including RoboHelp 2019 Classic.
If your are using RoboHelp 9, it is vital that Service Release 9.0.2 is applied to your machine as that updated the process in important ways. What is described below will not work unless that service release is applied.
If after following these instructions you still do not get the expected import, take a look at Importing Word Documents and Troubleshooting.
The process for RoboHelp 9 is the same for RoboHelp 10 and above except that in later versions you will be given the option during the import to automap the styles. RoboHelp will then match any Word styles with identical style names found in your CSS.
Best Practice
I recommend that you do not import Word documents into your carefully crafted main project. Import them into a project set up just for the purposes of importing.
If it goes well, then import the htm files created into your main project. If losing the Word TOC or Index is a problem, repeat the process importing into your main project knowing it will not be spoiled.
If you have problems then nothing is lost, just trash the temporary project and start again.
If you intend to create printed documentation from your project later, try it early on as problems from the import can manifest themselves there. Leave it until later and you may not make the connection between the import and the problem.
Before you start
The import process will be smoother if you first prepare the Word document, it is reliant on a properly constructed Word file and the old rule of "rubbish in, rubbish out" certainly applies here. RoboHelp is having to convert the document from Microsoft's file formats into HTML, think along the lines of mixing oil and water. Use Word to save the document in HTML format and you will see the HTML is not pure HTML and that is what RoboHelp has to deal with. So what do you need to do?
- Make a copy of the document and work from that rather than risk spoiling an important document.
- Remove any unwanted cover and blank pages from the document.
- Removing any inline formatting and applying proper styles will help. To remove all inline formatting from a Word document, press CTRL A to select all the text and then press CTRL and spacebar.
- A typical document will have been worked on by many people who have created styles if you are lucky, more likely they will have applied inline styling. Also it will typically contain a large number of styles that are not used but the import process nevertheless lists them in the Word Document Settings window. What you see below in Figure 3 is from a clean document, typically the list can be many times longer and it can be difficult to know which styles need to be mapped and which can be skipped.
- There are two ways to get rid of the unused styles. If you are happy to run a macro, go to Word Tips and download the macro you will find there. Otherwise, create a new document and paste in the content of the document you want to import.
- Ideally I would like to see RoboHelp filter out the unused styles. The argument for retaining them is for when authors want to keep the topics created from the import looking as they did in Word and may want to make subsequent edits using the styles available in Word. I can understand that point but I think that most people want their import to take on the style of their other topics. I hope Adobe can offer filtering as an option in the future. Please submit a Feature Request if you agree.
- If your document contains PNG images, it is important that you tick a Word option. In Word 2010 it can be found in File > Advanced > General > Web Options - Tick the Allow PNG as a Graphics Format checkbox.
- Without this option ticked, the images will be converted to poor quality GIF images. It is also important to note that this is a document specific setting, notwithstanding that it appears in a group of settings titled General Settings!
- To stop PNG images being converted to JPGs, it is important that they are shown at 100% in your Word document. To import a document, RoboHelp first uses Word's functionality to save the file as an HTML Filtered file. If you save a Word document using that format, you will find that Word has saved any file not shown at 100% in the JPG format. If you only have a few files in the document that are not shown at 100%, right click them, select Size and Position and click Reset. If you have many images, see the Word page on this site to download a macro that I found on the internet. When the document is saved with Word's Web Page Filtered option, the images will then remain in PNG format.
The Process
I will describe the process with a document created from a clean template (a minimal number of styles). See Downloads below if you want to test with the same document. It is short but it contains the following features:
- A Contents page.
- Bulleted and numbered lists.
- Tables.
- Images in GIF, JPG and PNG format.
- Cross references.
If the objective is to get the topics created from the import to look the same as existing topics in the project, you will want to use your own CSS. See Step 7 below before you start importing.
If the objective is to retain the appearance of the document, ignore the mapping process described in Editing the Word Conversion Settings.
- Optionally create a new project for the import. See Best Practice above for the reason I use this method.
-
Optionally create a folder in Project Manager into which you will import the document. For the purposes of this tutorial I have called the folder "word_import". That ensures the topics created from a specific document are in a unique folder making any cleanup work easier.
- Right click that folder and select Import.
- The Content Settings dialog will be displayed.
- Tick the required options. I have elected to have the Word TOC added to the existing RoboHelp TOC.
- Click Next. The Import dialog will be displayed.
-
The Settings field and the CSS field are a little confusing at first Here's how they work.
-
The first time you open this dialog, what you see in the CSS field will be whatever is set in File > Project Settings > Import Tab. By default that will be RHStyleMapping.CSS but you can change that to any CSS that has the styles to which you will want to map later in the process.
-
If you have imported before and saved the settings in an ISF file (Import Settings File), you can use them again by clicking Browse and navigating to the ISF file that you saved. That will change all the settings to whatever was saved, including the CSS file.
-
When you next come to this dialog after saving the settings in an ISF file, the dialog will show that ISF file selected. If you now want to use a different CSS, you need to either select another ISF or change the default in Project Settings and then what you will see here is [Custom] in the Settings field and the new default in the CSS field. Later in the process you can save a new ISF file or overwrite the old one.
-
It's more logical than it may seem at first reading but beware...
-
There is a gotcha in the process.
Let's say you use an ISF file by browsing to it as shown in Figure 2, then you change the settings and export those settings overwriting the original.
When you next import a document, it will still show the same ISF filename so you will likely think RoboHelp will use the settings you exported. Wrong! RoboHelp is simply displaying the last file you used but unless you browse to the file again, it will use the settings that were defined at the start of the previous import, not what you exported.
- Click the Edit button. The screen you will access is described below in Editing the Word Conversion Settings.
- After saving the conversion settings you will be returned to the above screen.
- Optionally save your settings for future use by clicking Export. (I recommend that you do save the settings.)
- When you return to the above screen, click Finish.
- The topics will be created and show in Project Manager.
See Post Import after the next section.
Editing the Word Conversion Settings
When you click the Edit button on the Import page, RoboHelp will scan the document and then display the Conversion Settings window.
In the screenshot below, the number of paragraph styles is minimal because I worked with a clean document. The importance of this is described above in Before You Start.
The settings are described in detail below. The details are important!
|
Setting |
Field |
Description |
|
Paragraph |
RoboHelp Style |
If left as Source, RoboHelp will create a class in the CSS that will have definitions written by RoboHelp so that the topics created will look the same as they did in Word. Instead you can use the dropdown to select a style from the CSS that RoboHelp is going to use during this import. That is where I hit a gotcha with the import process. This is the first import so there are no saved ISF files and the supplied ISF file does not allow you to change the CSS file that will be used so you cannot see your styles. There are two options.
So back to mapping now that you can see the styles you want.
UPDATE 12 March 2012: I have since found that the styles shown in the image are what you will get if the lists were created using Word's icons for lists. If the lists in the document you are importing have been created using Word styles, those styles will be listed for mapping. Again whilst it may seem illogical, map those styles to Normal and they will import correctly. If you required different levels of indentation, then map to styles in your CSS such as Normal, Normal Indent 1, Normal Indent 2 and so on. 29 Apr 2014 If you use the Rh Style Mapping CSS, you will not see Normal in the RoboHelp styles dropdown. You can either edit that file and add a <p> style to it or use your own CSS. |
|
Glossary Definition |
Tick if this style is to be used for glossary definitions. |
|
|
Glossary Term |
Tick if this style is to be used for glossary terms. |
|
|
Pagination |
If this field is ticked, RoboHelp will start a new topic each time it finds the style in Word. |
|
|
User Defined HTML Tag |
This field will mostly be used when importing FrameMaker documents that also use this screen. Ignore it when importing from Word. |
|
|
Character |
|
Select the character style to map to. It will list the same styles as in the Paragraph field. Mapping here is only required if you have used a style as a character style in Word. If in doubt, apply the same mapping as for Paragraphs. |
|
Table |
|
If you want your Word tables to map to a table in your CSS, select the required style. If you want your table to be 100% in RoboHelp, it must be set to 100% in Word. Just because it fills the page width in Word does not mean the table is set to 100%, check the tables properties in Word. |
|
Other
|
Auto-create CSS styles from Inline Formatting |
See RoboHelp's online help. |
|
Convert References to Hyperlinks |
Word can contain references and hyperlinks. RoboHelp understands hyperlinks so this option allows you to convert the references. |
|
|
Convert Header |
Tick if you want any Word header converted to a header in your topic. |
|
|
Convert Footer |
Tick if you want any Word footer converted to a header in your topic. |
|
|
Convert Word List To |
Select HTML List to convert any lists in Word to standard <li> tags. Select RoboHelp List to convert any lists in Word to multi-level lists in RoboHelp. Note that the generated CSS will contain multi-level list styles for ALL lists that are in the Word document but only use them if this option is set to RoboHelp List. My import document contained only two single level list styles and and I chose the Select HTML List option. Thus while the CSS created contained 13 multi level lists, they were not used with this option. Some minor numbering format and list indentation issues were corrected when I applied my own CSS. |
|
|
Context Sensitive Help Marker |
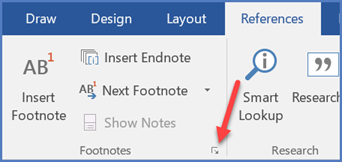
This field can be used for both importing and linking although it is perhaps more useful with linking. It enables you to set up a marker so that map ids are created "automatically".
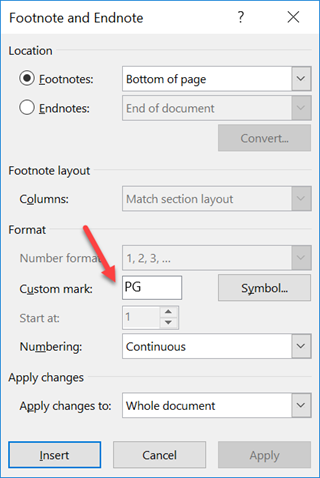
WordBefore you start, you have to decide how the pagination will be set in RoboHelp. For the purposes of this explanation, we will assume it will be based on each Heading 1. Against each Heading 1, enter a footnote. Go to the first Heading 1. It is important that you click where shown below.
This will bring up the dialog shown here. Enter a marker that will be used for each topic.
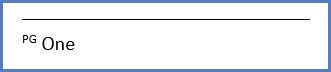
When you click Insert, Word will show the footnote area with just your marker. Add whatever you want for that footnote.
When you click Insert, Word will show the footnote area with just your marker. Add whatever you want for that footnote.
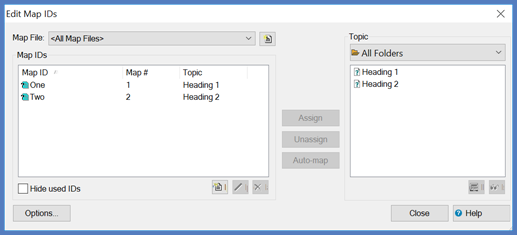
Move to the next header and repeat the above process adding different text for each topic that will be imported or linked. What you enter here, will be the ID. Save the document. RoboHelpIn RoboHelp, make sure your pagination setting is for Heading 1, or the same as you have set up in Word, and that this field is set to the same marker, PG in this example. **************************************** If importing, look in All Map IDs and you will the map ids set up. If linking, this will appear when you update.
|
|
|
Topic Name Pattern |
This allows you to define how the filenames are generated. See RoboHelp's help for the detail.
|
|
|
Use only ASCII generated characters in generated filenames |
I recommend ticking this to avoid problems later. |
|
|
Select |
UPDATE 10 March 2018. Last year Paul Hanson sent me a screenshot showing some fields that neither of us could get to appear again. Paul just emailed me again showing an option which if selected revealed those fields. This time his screenshot was taken before he had selected his CSS and the wording shown below made me realise what the trigger was, importing more than one document at the same time. You will only see this field if you are attempting to import more than one document at a time but it has a potentially huge benefit. When you click the dropdown, you will see various options including your existing CSS file. When you select one of the options, other self evident fields will appear.
If you want to use this field but only import one document, create a blank Word document and import that as well, then delete that one after import. Are there any downsides?
SummaryI think it basically comes down to how consistent you want your topics to be. If you edit an original topic it will be fine but it will not be 100% the same as an import. That said, the differences seem to be with lists and not unacceptable. If you just want a quick import that looks good and does not need editing or outputting again as a document for editing by someone using it as the basis for say a training manual, then this seems to be a good method. If your findings are different, please see the Contact page on this site and let me know. |


Post Import
If you do not use the Select option above, then it is important to understand that RoboHelp will create a CSS for the import of each document. Not using the option above, I mapped the styles to my own pg_std.css, RoboHelp has created its own CSS (For902ImportTests.CSS) as shown in Figure 4. It does this in case the document contains styles that have not been defined in the CSS used for mapping. I would prefer that it linked to the CSS I defined as any errors caused by me in not ensuring the styles exist are mine to fix but that's the way it is.
With Service Release 902 applied, in most respects the import was what I wanted. The lists were indented a little further than expected and the font for the numbering was not the same as in Word. The indent and the numbering were corrected as soon as I applied my CSS file, also included in the zip file that you can download from the link below. If your CSS does not correct the lists, you will probably just need to modify the <ol>, <ul>, and <li> tags.
Fixing the import
Post import I took the following steps
|
Meta Tag |
RoboHelp has always created the following meta tag when importing. <meta name="OriginalFile" content="ForImportTests.doc" /> It seems to do no harm in online help but I have seen it cause problems with printed documentation. I suggest you remove it. |
|
Internal (Embedded) style sheet |
You will find an internal style sheet in each topic created. You need to delete it as otherwise it will override anything defined in the external CSS used for the topic. Typically you will see blue for unvisited links and purple for visited links. The style will be something like this. <style type="text/css">/*<![CDATA[*/ As the string is multi-line you will need to use a tool such as FAR as RoboHelp's Find and Replace in Files (up to Rh9) will not find strings that are split across lines. If you don't have too many topics you can do this in the HTML view of each topic. Rh10 and above will find strings across multiple lines but see the Archive topics as there is a bug in the Must Include option. There is an alternative solution if you have control of the documents being imported and better still, their templates. In Word, click the bottom right corner of Change Styles to show the Styles pod. Click Manage Styles. Locate the Followed Hyperlink and Hyperlink styles and set them to the colour you have in your CSS. When you import, the internal style sheet will still be there but it will not need to be removed as the colours will be the same as in the CSS. |
Any other issues?
Tables
If you didn't map your tables during the import or want to change the style you mapped to, it is easy to fix them in RoboHelp.
- Right click in the table and select Table Styles.
- Tick Clean Inline Styling. (Skip this step if you are just changing the table you mapped to.)
- Select the required CSS table.
- Click OK.
- Apply any table / column widths that you require.
Table of Contents
The books will be based on Heading 1 styles with links to the topics. Any Heading 2 will then appear as a topic within the book. If you do not want the books to be linked and prefer the topics to be listed below the book, you will need to amend what RoboHelp has created. What RoboHelp has done is not wrong, it is simply one way of creating a TOC and it may not be your way.
RoboHelp also created a topic showing the TOC in Word. I'm not sure that anyone would want that as well but it is easily deleted.
Topics Still Have Word Styles Referenced
If you see lots of inline styling that does not look right, particularly if it contains MS indicating a Word style, select all the content (CTRL + A) and go to the Edit menu, Character section. Click the Clear Formatting icon. That removes all inline formatting. Obviously you will need to check the topic to ensure the CSS styles are what you want. One way is put the cursor at the top of the topic and keep pressing the Down arrow. If the style shows in the Edit ribbon in upper case, it means the style applied is not in the CSS file.
The ISF file
ISF stands for Import Settings File. When you export the settings as covered in Step 10 of The Process, those settings are saved in an ISF file. The zip file you can download below also contains the ISF file that I used.
Download
Click here to download the document I used for importing, the ISF file used and the CSS file.
Donations
If you find the information and tutorials on my site save you time figuring it out for yourself and help improve what you produce, please consider making a small donation.